Monday, June 22, 2015

Fifteen Photos of Fifteen Chickens

The human population of our home is now so well outnumbered as to leave no doubt about who/what is in charge, with the long-anticipated arrival of Will's chicks. You might recall that this is Will's own project--she proposed the idea and received permission, picked out exactly which breeds of which sexes from which hatchery she wanted to order (I am not personally comfortable with ordering chicks by mail, but I am not my child, alas), and is the final authority on their care (I wanted to start letting the chicks outside in our small coop, for instance, but was overruled--"The care sheet says four weeks," she decided). She has a lot of help, of course, especially in these early days, but there's plenty of time later to negotiate our roles and benefits as primary investors when her egg business gets going.

For now, however, we have thirteen (you may remember that we ordered fifteen chicks--our order was shorted by one, and one died the day after they arrived. This was super sad, but also a relief to the adult human population, as we needed seventeen chickens even less than we need fifteen chickens) beautiful, sweet, funny babies to adore.

Knowing us as you do, you will not be surprised to learn that we have spent the past week doing "chick portraits" every day. I have a truly shocking number of photographs of our chicks, and I am going to insist on showing you every single photo, on account of I am besotted by these babies, but in order to not stretch your patience too far, I'll confine myself to fifteen photos per post, in honor of our total flock number (can't forget our Fluffball and Arrow, now can we?). I'll also try to give you their names, although to be honest, only the kids can really tell them all apart, and I'm pretty sure that sometimes they're just making that up:
I'd like you to meet Featherbutt. 

This is Hermione. 


Here is Dan Quayle.

And this is Marshmallow.


I believe that this is Spot.

And here is Sun.

That's a few of our chicks. There are many more to come.

Why, you might ask, did I permit my child to buy thirteen more chickens, when there are only four people in our family? That is a fair question, Friends. Matt and I don't want fifteen chickens. Frankly, if these thirteen are as friendly and tame as the first two, I don't know how we're going to manage so much as walking unmolested in our yard, much less backing out of the driveway (I already have to station a kid outside the garage when I back out, to keep clueless chickens and carefree cats from wandering behind my wheels).

Seriously, fair questions all. And yet, the answer is also an easy one.

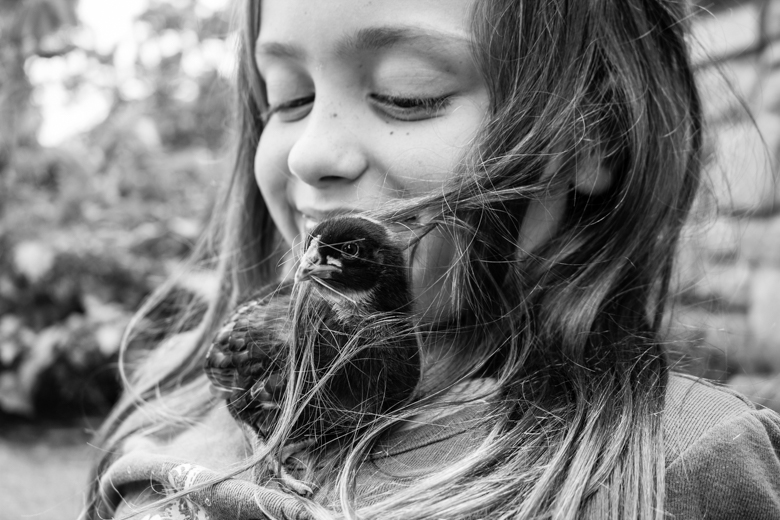
Why, you might ask? This is why:


The look on that kid's face? That kid who usually finds it such a struggle to get outside her own head, to let her tender heart show? That look is worth a lot more than just fifteen chickens.

Friday, June 19, 2015

Barbie Fashion Photography

One of Syd's grandmas gave her new Barbie dolls and clothes for her birthday--just take a moment and visualize my child's glee at that gift. Now multiply it by a power of ten, and you've got it about right.

Syd loves dressing up her Barbies, loves making clothes for them, loves having fashion shows for them in all their outfits, so I suggested fashion photography as something else that she might like. Would she like to try it?

She would.

We only did a couple of photos, because I wanted to look at them on the computer and see what I needed to change about the set-up before I let her loose to do all that she wanted, but here's what she shot:


Yeah, I think this activity is a winner.

I'll share a tute another time, when I set it up again for Syd to use, but the basic set-up is a big sheet of paper for the backdrop, something unobtrusive for the Barbie to lean against, and a REALLY low tripod already set up so that the kid doesn't have to do a lot of camera fiddling to get her perfect shot. I actually don't have a tripod that goes so low, so I used a couple of cinder blocks, which wasn't totally ideal since it wouldn't hold the camera at an angle, but it clearly worked. 

Next time, I can also guide Syd into thinking about poses, and the difference that it makes when your subject is looking at you vs. looking away. It'll be a nice little hands-on photography unit, don't you think?

And maybe I'll do this one, myself!

Thursday, June 18, 2015

Secret Bookmarks: A World of Girls Take Action Project

One of my favorite things about Girl Scout badges is that the badge books always encourage the girls to use what they've learned to perform service. They're asked to think about how they can use their new skills and knowledge to do something for younger scouts, their schools, their communities, or the larger world. I love that emphasis on helping others with your own unique talents and skill set, love how it's integrated into everything that the children achieve.

It's an elegant and effective way to raise good, strong women.

Some of these service projects can be quite large--my two built a bookshelf and held a book drive for a local food pantry last year, and my troop has some big plans for a big moviemaking project with our local animal shelter later this year--but not all of them have to be epic. The badge books emphasize that even small acts of service count.

Syd's small act of service for her recently-completed World of Girls Journey was the creation of "secret bookmarks;" she handmade several bookmarks and sneaked them into library books. Here they are:

Syd's reasoning for this Take Action Project was that 1) children would really like to discover special, homemade bookmarks in books that they were reading; 2) having bookmarks of their own would encourage children to read more; and 3) having bookmarks of their own would encourage children to use them, thus keeping the library books in better repair.

For what it's worth, I think she's right on the money on all counts.

This project was also a great opportunity to have a brief discussion about archivally-safe materials and techniques--I'm finally getting some use out of my Master's of Library Science degree! When you're shopping for your own archivally-safe materials, look for the terms "acid-free" or "archival quality;" that will ensure that if a bookmark does happen to stay in the same spot in a book for, say, twenty years, it won't stain or pit the pages that it touches.

Syd didn't create many bookmarks, but the ones that she did create were thoughtfully designed and painstakingly drawn:
That one on the middle right is a zombie. To my knowledge, my child has never been exposed to any media containing a zombie. I *may* often speak about zombies, however...
I love the positive messages that she put in some of her bookmarks! I also need to reinforce "you're" vs. "your," clearly. 
... and capitalization at the beginning of a sentence. I'm impressed that she spelled "piece" correctly, however!
The book reads, "Once upon a time ther was a child who read a book whith these words "Once upon a time ther was a child."
After the kids get back from camp, we'll be having a bit of a "badge boot camp" instead of school for a few days, as at the beginning of the year they had picked out some specific badges that they had the goal of earning before they both Bridge to the next level, AND I bought those badges for them. Our Bridging Ceremony is early next month, but when your mother spends money on you as part of your goal, then you WILL reach that goal!

Tuesday, June 16, 2015

My Latest: Rain, Bones, Feathers, Candy, the Ocean, Density, and Aluminum

June has been bustling--as usual! I've been creating lots of etsy orders, as well as working on house and garden (poison ivy is EVERYWHERE, and I've discovered that we have tons of black raspberries hidden behind tons of multiflora rose and honeysuckle!). Homeschool continues throughout the summer, as does Girl Scouts, and therefore so do lesson plans. We snuck away on a short weekend trip to Arkansas, and also, we have chickens!!!

In the midst of all that typical chaos, here's what I've been working on for Crafting a Green World:


a definite Pinterest fail


Coming up, I've got some books to review, a chalkboard project to tell you about, some nature crafts to try as soon as I stock up on colorful yarn, and I'm thinking of learning how to make video tutorials. The kids and I are exploring earthquakes, so I'm planning the construction of a shake table, and we're finishing up our study of Georgia O'Keeffe, so I'm setting up a still life for us to paint today, and I desperately need to label and pack all the things for the kids' next week at sleepaway camp!

But right now it's raining, so I'm going to go make myself a cup of coffee and an egg sandwich instead of weeding the strawberries. Yay!

Monday, June 15, 2015

Ballerina: Three Years


Summer Intensive ballet recital, June 2015

Ballet has grown this girl in so many ways, and I'm thrilled to watch her embrace it, enjoy it, and excel in it. I've noted before how easy it would be to push this kid--she's a perfectionist, she's driven, and she adores approval. Wouldn't it be so temptingly easy to put her into competitions, to instruct her to practice for hours every day in order to reach perfection, to allow trophies and prizes to be the positive reinforcement for yet more competitions and more hours of daily practice?

And she'd love it, I suspect. She'd crave the feeling of winning, grow addicted to the possibility of actually achieving perfection, let losing hit her self-worth and spur her into greater effort. 

I fear that. I actually fear the higher levels of dance, because I fear that she'll somehow hear and internalize those beliefs, internalize body standards and mold herself to them. I have a friend who dances, however, who assures me that in the world of ballet, that kind of thing is actually very rare. Instead, she tells me about self-confidence, about strong cores and excellent posture, about developing work ethic and focus, about the bravery that performance brings. 

And as I sit in the university's large dance studio and watch the children from the Summer Intensive class perform their recital, half of which they choreographed themselves, see my child spinning in duet with a friend dizzily about the space as another child leaps with out-of-control abandon and three more march in circles in front of all the parents and grandparents, showing off this number that they "choreographed" themselves ("Think if it more as an improv," one of their instructors informed us in her introduction to the piece, "that expresses the joy of dance"), I don't see anything here about unhealthy standards or an unattainable drive for perfection. 

I simply see a bunch of kids--all with excellent posture and a lot of self-confidence, to be sure--expressing the joy of dance, and I love it.

Sunday, June 14, 2015

How to Make a Stylus from a Dowel

Easiest. Tute. Ever, y'all!


Sometimes you need a stylus. A stylus is useful for embossing into aluminum, or creating scratch art, or carving into clay; none of those things can be done well with a pencil, which is going to get graphite into your work, or with a nail, which is too sharpy.

Of course, you also totally do not have a stylus. Seriously, who has something like that?

Fortunately, it's super easy to make.

You will need:

  • dowel. Choose one of the thinner diameters, but otherwise, anything from your stash will do.
  • saw. A hand saw will work fine.
  • pencil sharpener. An old-school metal one with several sizes of openings is the kind that you need for this.

1. Cut the dowel to size. Six inches is a good maximum length for a dowel, so mark and hand-cut your dowel to that length with a hand saw, 

If you really need to use a circular saw on account of you love power tools, I'm not going to stop you, but a hand saw is all that's necessary.

2. Here's the awesome part: SHARPEN YOUR DOWEL IN THE PENCIL SHARPENER!!!!!!!!!!11!!!!!

 You've got to use a metal pencil sharpener for this, and unless your dowel happens to be the diameter of a pencil (stranger things have happened!), the pencil sharpener will have to have an adjustable diameter--think elementary school pencil sharpener--but other than that, it totally works like a dream.

And Friends, I also sharpen CHALK in that pencil sharpener!

My kids used these this weekend to make embossed aluminum pendants for Will's Girl Scout Junior Jeweler (say that three times fast) badge, but once upon a time, I waaaaay overbought scratch art sheets, and these styli--it's totes a Latin word, so hence the 2nd declension masculine nominative plural ending--are great for that as well. The kids also use them for clay, and yes, I have seen Will shoot sharpened dowels from her bow. We play rough around here, Friends.

Friday, June 12, 2015

Kitchen Science: Density Cake

You'll excuse me, I hope, if this reads as a bit scattered today, but I bolted awake this morning to a phone call telling me that Will's chicks were at the post office waiting for us!

The kids and I took a field trip to the fire station a few months ago, and during that trip a firefighter lectured us on the importance of middle-of-the-night fire drills, because when people are awakened from a sound sleep, they awake confused.

Friends, I awoke confused.

I tossed the room looking for my pants, gave up (I found them a bit ago, tangled in the sheets), couldn't find new pants, found pants, forgot where I put my phone down, spent ages looking for it, found it, woke the kids, remembered that the brooder wasn't completely set up, had a right panic about it, couldn't get the heat lamp at exactly the perfect height to emit exactly the perfect temperature and was completely unable to troubleshoot this, tried many things, gave up and went to lie down for a few minutes, remembered the ladder and dragged it in from the garage to serve as a heat lamp stand, couldn't find the address of the post office, set the phone down and lost it again, etc.

Fortunately, by the time the kids had found a height that worked for the heat lamp and got the brooder temperature approximately correct, the fog of sleep had somewhat lifted from my brain (the coffee that I drank as the kids worked was crucial to this process), and I only had to go to the wrong building, call the post office and get directions to the right building, and then go in the wrong doors of the right building once before I successfully located our chicks.

They're safely home now, drinking and eating and bopping around their brooder, and I've declared today a Chick Holiday, because who can be expected to do math and spelling and history when there are FIFTEEN CHICKS BEING CUTE?!?

Therefore, the science project that I'm going to tell you about actually occurred earlier this week. I'd told you that we were finished exploring density for a bit after the Great Density Experiment, but then I realized that the kids had really only explored the density of liquids, so I thought that I'd set up just one last little project so that they could note to themselves that density also applies to solids.

The goal of this experiment is to determine which cake toppings are less dense than cake, and which are more dense. Instead of measuring mass and volume to determine this, the kids let the substances themselves illustrate their density, by placing all toppings on top of the cake, baking it, and then examining it to determine which toppings fall to the bottom of the cake and which toppings stay up top.

To do this experiment, you will need:

  • cake mix. The kids are capable of making cake from scratch, but that's another project in itself, with different variables (Did the kid put in enough baking powder and soda? Did the kid put in the correct amount of flour?), so to make sure that the cake itself would be a neutral substance, I let the kids pick out a boxed cake mix.
  • toppings. Guide the kids just enough to make sure that they're choosing substances that will float and substances that will sink.
  • paper to record the experiment. Lab notebooks would be ideal, but I'm still working the kids up to those.
  1. Have the kids prepare the cake mix and put it in the baking pan.
  2. Lay out all possible toppings. The kids used frozen tart cherries, candy-melt wafers, caramels, chocolate chips, almond slivers, pecan pieces, M&Ms, and dehydrated marshmallows.
  3. Have the kids grid out the cake on a piece of paper, and as they place the ingredients, they should record each location on their grid, along with their hypothesis of the substance's behavior during baking. The grid will look like this:

And the cake will look like this!

Pop the cake in the oven and bake it according to package directions. When it's finished, you can evaluate your hypotheses based on observation--

--and core samples:

I was pleased that the kids hadn't correctly predicted the behavior of every single substance, because surprises are fun. And the little girls who came over to play "mud kitchen" with Syd that afternoon quite enjoyed helping us eat our density cake!

Monday, June 8, 2015

The Great Density Experiment, or, The Best Science Project EVER


I don't even remember now how the kids ended up getting interested in density (if you do, please remind me!), but fascinated they were, so I planned a little unit of study for them to explore this property of matter.

The kids watched the density videos from Simple Science, memorized the definition of density (Density is the relationship between a substance's mass and its volume) and the formula to calculate it (d=m/v), and I attempted to guide them through the creation of an ocean in a bottle, a craft project that would be both cute and would demonstrate the interesting interaction between oil and water, but I didn't realize that the sand called for in the project is craft sand, and so I used SAND sand, and it was a total Pinterest fail:


The following day's density lab, however, was one of the most successful homeschool projects that we have ever done. I set up the following invitation--


--with the following supplies:
  • pan balance scale
  • measuring cups
  • empty, clean peanut butter jars
  • eyedroppers
  • test tubes and test tube rack
  • liquid watercolors
  • mineral oil
  • glycerin
  • marbles
  • container for water
  • liquid starch
  • corn syrup
  • rubbing alcohol
  • vegetable oil
The kids brought out their own science/math journals and pencils.

The kids' instructions were simple: explore the substances, making observations about their densities when compared to each other, and record everything in their notebooks (I'm working my way up to introducing them to lab notebooks, but hoping to do it gradually enough that Will won't rebel at all the writing required in keeping one).

The kids found this activity completely engrossing. Using the test tubes and peanut butter jars, they explored every single substance in every single combination possible, I imagine, constantly making discoveries and uncovering wonderful interactions:

water and liquid starch

mineral oil, colored water, and corn syrup

adding more corn syrup by eyedropper, and watching it fall to the bottom

Will kept adding to this one, and we kept being amazed by what happened:


recording it all in her notebook without a fuss--yay!


This is the notebook that she earned for completing the scavenger hunt at the Art Institute of Chicago.

Liquid watercolor and water

The colored water, administered by eyedropper, falls through mineral oil and bounces off of corn syrup:


ordering the substances by density in her notebook

Will reproduces Syd's experiment, with the same fascinating results.


When the kids found combinations that they especially liked and that seemed stable, I asked them to reproduce them on a larger scale, so that we could keep them to observe for a few days:


This was a gold-standard homeschool project, the perfect combination of concrete learning and free play that I know I'm going to be striving for in all our future projects. For now, we're leaving density and moving on to earthquakes, of all things, but this is a lab that will certainly bear repeating, with even more substances to choose from, the next time the subject comes up.

Here are some of the other resources that we used in our study of density: