Showing posts with label Perler beads. Show all posts

Thursday, November 12, 2020

DIY Perler Bead Gift Tags


For how many months does one have to endure cabin fever before they get the idea to make personalized, reusable gift tags?

Just about eight, apparently!

But think about the time that it'll save me, not having to create and write out a brand-new gift tag every time I wrap a gift! Perhaps as much as five minutes at a time, depending on how much effort I would have put in!

Will and I were noodling around with Perler beads the other day and I was schooling her on everything Britney Spears (#FreeBritney, y'all) when I made these particular gift tags. I really wanted them to be round, but figuring out how to do an initial on the circle peg board is hella tricky!

Here's my S:

W is much easier, mostly because it can also be M!

Each gift tag also needs a hole for threading ribbon through, but if you need a Perler bead creation to stand up to wear and tear, it's best not to leave just a single row to support it. Two rows of Perler beads between the hole and the edge of the tag ought to do just fine!


You've also got to iron a Perler bead creation a little harder if you want it to be more than just a decoration. Some people only like the look of barely-ironed Perler beads with the holes nearly perfect, but it's got to be smooshed quite a bit more to make a gift tag that will last for the next forever years:


Not gonna lie, Perler beads are kind of tedious, so after Will bailed all I did was finish out my set:

I LOVE them, but I'm also going to be on the lookout for a MUCH quicker and less tedious method to make more reusable gift tags.

Because, you know, let's not even think about how many gift tags I'd have to write over the next however many years before I've saved myself time by making these babies!

Here are the Perler bead supplies that I used:

blah

Tuesday, August 22, 2017

"Resist!" Perler Bead Sign from Crafting the Resistance

The tutorial in Crafting the Resistance makes a knitted bookmark, but I don't have knitting needles and yarn and... knitting skills. I don't have those, either.

You know what I DO have?


Perler beads. Audiobooks. A kid who loves nothing better than to sit down and hang out and craft with me.

So that's what we did! This project is modified from the Well Read Bookmarks in Crafting the Resistance; I followed the chart, but instead of knitting the pattern, I created it in Perler beads:

Yep, those are GLOW-IN-THE-DARK Perler beads there! You can resist even at night!
The kid? She made herself a giant Applejack:

I received a pdf of the book from the publicist for review; I actually find craft books really hard to review over pdf, but it IS handy to be able to simply print a page to access the template.
Applejack now lives on the wall in the kids' bedroom where Syd is displaying her Perler Bead My Little Ponies--

This is one of the results of the kids' bedroom redesign: dedicated display space for Syd's My Little Pony collection! Right now, we've got her Perler Bead Ponies and a framed piece of fanart that I bought her from a Comic-Con, but I'm hoping to add small shelves and convince Syd that her My Little Pony toys could live there, too.

--and the "Resist!" sign now lives above the big work table in our studio--


--where it can inspire us to use our hands to change the world.

Friday, June 9, 2017

I Also Made Girl Scout Perler Bead Cake Toppers

Because why pack for Greece when I can spend half the day making something that I won't need until October?

It's for the simple reason that there the kid sat, all companionable and listening to Sherlock Holmes audiobooks with me. How could I pass up the opportunity to blow off all the chores that I *need* to do and instead do something fun with my kid?

Even though I need to make another "4" cake topper before I turn 44 in three years, I decided that it would be ridiculous to make something that wasn't needed until 2020; instead, I made something that isn't needed until October, 2017:


Trefoil cake toppers for all of the girls in my Girl Scout troop!

I'm pretty proud of the design, which I futzed around with teeny Perler beads for a while to figure out. Happily, the design that I figured out also happened to be large enough that I was able to futz around and figure out how to add a monogram for each girl. The "A" and the "M" were the hardest to come up with:


And after all of these cake toppers, I finally got enough practice ironing that they mostly look pretty good. Ironing Perler beads is harder to get right than you'd think!


The plan is to make a cake something like this one for our Bridging ceremony in the fall, and have each girl's own cake topper on the part that represents her new level.

Perhaps I should also put the year on, since I have these lovely number cake toppers, you know...

Wednesday, June 7, 2017

I Made Perler Bead Cake Toppers For The Next 59 Years


Handicrafts afternoon with the little kid went well.

So well, in fact, that we spent this morning in handicrafts, too, back at the playroom table and messing around with Perler beads.

We listened to Homer Price, then the NPR Road Trips CD, then some Sherlock Holmes. The little kid made a giant Perler bead dolphin that is one of the annoying things about Perler beads, because where on earth is she going to put a giant Perler bead dolphin, and then a 3D Rubik's Cube that I have no problem finding a place for because it's awesome.

And I? Somehow I got sucked down into the vast rabbit hole of Perler bead cake toppers.

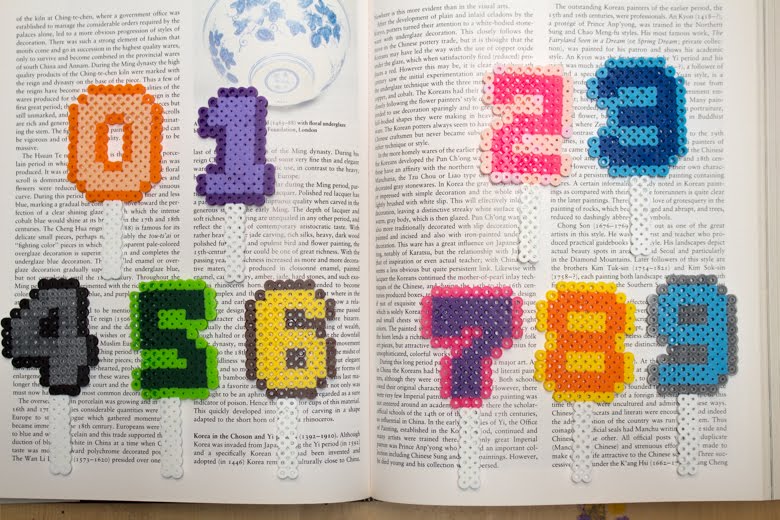
We always use my homemade rolled beeswax birthday candles for our birthday cakes (and so should you!), but I've been kind of wishing that I had something that would show ages, as well, because those big number candles are super cute. I started out trying to recreate the number candle--


--but it looked too on the nose, so I tore off the flame, and then made a whole set of digits 0-9, each number in its own colorway.

I could have gotten by for a couple of years with just the numbers 0-4, but what can I say? I'm a completionist! Anyway, they came together quickly enough, especially while listening to Sherlock Holmes, that it wasn't a chore to make the whole set.

I'm happy that I made each number its own colorway, so that nothing looks mismatched, because everything looks mismatched. Here's what the cake toppers will look like on the big kid's next birthday:


And then it's my turn--


And then it's Matt's--


--and before we know it, we'll be back around to the little kid again!


And if you think that I stopped making cake toppers right there... well, another time I'll show you what I made for my Girl Scout troop!

P.S. Here's what I used for this project:


Pro tip: Do NOT buy the big bin of assorted Perler beads, even though it's cheapish. It is no fun to sort all of those tiny beads, believe me. Buy the small single-color bags, and spend your life doing something you enjoy.

Wednesday, August 12, 2015

Perler Bead Business Cards

I had been procrastinating on making business cards so shamefully that I was actually sending packages out without business cards in them.

Rookie move, Pumpkin+Bear!

The problem is that making business cards can be a little (lot) boring, so every time I have to make a new batch I try to do something different with them, to make the process more fun. I've done plain business cards on the backs of old record albums, fabric-backed business cards, vintage paper-backed business cards, business cards with stitching on them, business cards with beads dangling from them, photo business cards...

Inspiration was a little hard to come by.

As I was cleaning out one of my desk drawers (my desk is woefully messy, by the way. Sharing space with my laptop at this moment are a couple of packages to be checked, several books to review, schoolwork to be collated, shipping supplies, lots of pleasure reading, my morning coffee, a list of library books that need to be read and returned, the children's letter from Santa from TWO YEARS AGO, etc. Sigh...), I found all the little Perler bead candies that Syd had made, originally for her candy-themed birthday party, but, of course, she made about three times the amount that she actually needed for favors. I had tossed them into my desk drawer, not knowing what else to do with them.

And just like that--inspiration!

I used a little piece of double-sided tape to stick each one on, so that you can take it off and use it as a charm for something else.

Perler bead sweets aren't terribly thematically appropriate for my etsy shop, but, oh, well--they're cute and they were fun to make and they used up some bits and bobs that I didn't know what else to do with.

And they'll only last me for about a month or so, so if you've got any cute ideas for handmade business cards, send them my way!

Monday, April 20, 2015

A Passion for Perler Beads

Well, the kid finally did it.

As I've been telling you, Syd has been longing to make Perler bead My Little Pony figures ever since Comic Con, when we saw Perler bead My Little Pony figures in the exhibit hall (and did not purchase them). We actually had a wee stash of beads and some plates from a few years ago, when I thought the kids might like them (they did not), so all I had to do was order the packs that contain the colors that pattern-makers have been using for their My Little Pony templates (Why u come unsorted, Perler Beads?!?), and we were off!
Syd is making Rainbow Dash's cutie mark.
Even Will likes Perler beads, although she has less patience for fussy patterns, and most likes to fill in a pre-shaped board. I've promised to buy her this dolphin plate at my earliest convenience. 


One of my promises to myself as we shift around how we do school these days is that I will work *with* the children whenever possible--I'd gotten into the habit of shifting off the kids' schoolwork to them to do independently, and while they're certainly capable of that, I of course know that it's far more tiresome to work that way. And so as the kids made Perler bead flowers and fish and ponies and cutie marks, I made cupcakes!


Syd caught my enthusiasm, and made some cupcakes and "ice cream scoops," as well:

Ironing them is the worst part of the process--tedious, fiddly, and nearly impossible to get even with my admittedly pretty crap iron--so now that I've somewhat gotten the hang of it, myself, I plan to show the kids how to iron and let them fuss with it themselves.

I have reserved my cupcakes to make a charm bracelet for Syd, but her cupcakes, lollipops, and wrapped candy pieces (she created the patterns for the latter two herself) will become party favors for her candy-themed birthday party next month:


My favorites of my own Perler bead creations:
I modified this star pattern a little.
The Perler beads have stayed out on the table for the past two weeks, never unused enough to be put away, although I think that the enthusiasm may be waning enough now to give them a bit of a break. It reminds me of when the kids were a little younger, and one of my weekly homeschool plans involved setting out an open-ended project like this as an "invitation" that would stay for a week or so, being picked up and put down and explored and enjoyed during that time. This is something that I certainly think that I should again include in our days. 

With that in mind, my goals for both kids for our school week include math, grammar, spelling, and reading aloud every day; handmade gifts for a birthday party this weekend; a lesson on the causes of World War II at some point during the week; our regular extra-curriculars of volunteering, robotics class, horseback riding class, playgroup, and math class, and extra ballet recital rehearsals for Syd and the Trashion/Refashion Show this Sunday for all of us; and for Syd, with Will invited to participate if she'd like, a daily hands-on project, including a "DIY ocean" based on our aquatics class last week, more seed starting with me, experimenting with dyeing play silks, and upcycling spaghetti jars into vases in preparation for a Girl Scout troop meeting on flower arranging next week.

AND an open-ended invitation set out somewhere accessible. Snap circuits, perhaps? Clay? 

Ooh, maybe sketching supplies and a still life!

Thursday, November 8, 2012

Perler Bead Play

Sydney is hooked on Perler beads. Seriously, she's got it bad.

I bought the Perler Beads and a small selection of their pegboards several years ago, and Willow and I played with them a bit while Sydney napped (if only she still took two-hour afternoon naps...), but they caught neither of our fancies as more than a novelty, and so they've sat, on the craft shelves, for years.

There they sat, temptingly on a low shelf, ready for a certain six-year-old to discover in her own time.

Since their discovery, the Perler beads have spent their time either on our big living room table or off of it, scattered across the floor, until the kid responsible finishes throwing her fit and picks them up and sets them back on the table. Other than mealtimes and schoolwork, Sydney designs with them almost constantly. She makes things like elaborate hearts and colorful fish, challenging her fine motor skills and exploring patterning and symmetry.

I don't completely have the patience for Perler beads, and every time I finish a design and go to iron it and accidentally bump the design and all the Perler beads fall off and I have to re-do the design, I get pissed. I did join Syd yesterday, however, to make her a tree for her dollhouse:


The renovation of her dollhouse is something that Sydney has wanted to do for YEARS. She wants to give her plain, unfinished wooden dollhouse the works--paint, wallpaper, carpet, etc. I've been shamefully putting her off for just as long, because, frankly, the dollhouse cost too much to end up looking like crap (instead, I let her paint a small dollhouse), but now that my Sydney is six, and has the patience and fine motor skills and design sense to work with Perler beads, I'm thinking that it's finally time for that special project.

Just...after Thanksgiving, you know?

Tuesday, October 9, 2012

My Latest over at CAGW: DIY Car Air Fresheners and How to Drill Stuff


We've been making a lot of fused plastic bead suncatchers lately--the kiddos LOVE them, and I'm secretly trying to use up our huge stash of completely random beads:
and two buttons--oops!
Other than the pasta ones, which we dyed ourselves (and which won't work in these suncatchers, so we had to sort them out), they've all been given to us from here and there and everywhere, completely unsorted, and when they're gone I'll be replacing them on an as-needed basis with a much smaller number of very carefully sorted beads, so that we'll have an easier time getting organized for specific projects.

To make the suncatchers, start out with a set of novelty silicon muffin tins--you'll see in some of the photos that I also use regular metal muffin tins, but since those don't bend they're actually much harder to get the finished suncatcher out of, and I don't recommend using them unless you absolutely need that particular shape.

Fill the bottom of each mold with just enough beads to cover the bottom:

The beads will flatten and spread as they melt, so you want your layer to be pretty thin to maintain the suncatcher's translucency:

I move our garage sale toaster oven outside to the back deck for this project, and I would NOT do it otherwise. Melting plastic is a nasty business, and it will absolutely smoke and give off fumes, and you do not want those fumes in your house. So if you do not have a toaster oven that you can haul outside for this project, then I strongly recommend that you simply not do it. Wait around for garage sale season to come back--our toaster oven cost $4, and we seriously use it multiple times a day.

Set the toaster oven to around 250 degrees, and don't bother letting it preheat. Just set your silicon mold on the tray, put the tray in the toaster oven--

--and come back to check on it every few minutes. You'll first see the beads start to look really soft and slumpy--

--but leave them in until the beads look flat and the surface of the suncatcher is even:

Take the tray out of the oven, transfer the mold from the tray to a safe spot for it to rest, and let it cool:

The finished suncatchers should be quite sturdy, and I really like the way that they look:

To hang them, you simply need to drill a hole, add twine, and string them up! It's long been in the back of my mind to make a really cool Calder-style mobile, but so far we've been hanging them all individually, kind of like ornaments for our trellis and our trees:

I've got a miniature skull silicon mold set, so now I'm considering melting the beads in a thick layer in the skull molds, then drilling a hole through horizontally to make giant skull beads.

Because the world NEEDS giant skull beads, yes?

Wednesday, May 28, 2008

Bead It


The little kid has been taking these awesomely deep, long afternoon naps lately, giving me and the big kid time to work with materials that the little kid finds more pleasure in, um, tossing about while squealing with joy. Yesterday we strung beads on necklaces, but today we worked with Perler beads.

Perler beads are these crazy plastic beads that you arrange on a pegboard and then iron to fuse together, making flat and colorful shapes. When I first saw them I was pretty resistant to the idea of buying these new plastic materials in all the different colors you'd need, just to melt them, but the big kid worked with them on a visit to extended family and we acquired a large bucket of them there, and I bought the kids a small set on sale at Joann's for a treat one day, so somehow we're pretty well set anyway.

Obviously, what I want to make most from Perler beads is old-school Nintendo stuff,  like coasters or magnets or just the little figures that you could probably do a lot of stuff with. Old-school Nintendo and Atari images are extremely well-suited for crafts like beading or cross-stitching, because you can transfer the image pixel-by-pixel. Ah, 8-bit video! 

I haven't yet used my Michael's gift card plus 40% coupon to purchase one of these versatile large pegboards, however, so the big kid and I made ourselves a beautiful heart and star on the smaller pegboards. I thought the shapes, with coordinating colors, might make interesting decorations in the house--stars in the kids' bedroom, for instance, with the ceiling painted like a sky, or pink/purple shapes in the playroom, with its pink/lavender walls. These here are my first attempt, though, and I realize now after actually, you know, reading the instructions that I didn't iron well at all--you're supposed to only iron for 10 seconds and in a circular motion, whereas I ironed for more like 30 seconds, just bearing down hard, and I didn't flip the shapes over and iron the other side, which you're also supposed to do--and I'm not terribly pleased with the color choice in my creation, the heart, but the big kid's creation is awesome. Can you tell what it is? 

A turtle, of course! 

The big kid doesn't yet have near the manual dexterity to actually manipulate these teeny little beads (they do sell Big Beads for preschoolers, which would be cool if we ever found them at a garage sale or thrift store), so she mostly handed me beads and told me what to do with them and lost herself in bead reveries while pouring them through her hands like water, but you can clearly see the turtle's eyes, the color and placement of which she directed, and the legs and tail and shell and all. Such the artist.

P.S. Want to follow along with my craft projects, books I'm reading, foster kitten antics, road trips, and other various adventures on the daily? Find me on my Craft Knife Facebook page!